የደረሰኝ አወጣጥ
በእርስዎ ነካ መሣሪያ ላይ ያለው የሽያጭ (Sales) መተግበሪያ የተለያዩ የደረሰኝ ዓይነቶችን ለመቁረጥ ያስችልዎታል። ይህ መመሪያ ደረሰኝ እንዴት መቁረጥ እንደሚችሉ ሁሉንም መንገዶች ያብራራል።
ወደ ሽያጭ ማውጫ መግባት
- ከመነሻ ማውጫው (Home Menu) ላይ ወደ ሽያጭ (Sales) ይሂዱ።
- ለመግባት የመካከለኛውን ቁልፍ (ቁልፍ 7) ይጫኑ።
የሚከተሉትን አማራጮች ያያሉ፦
| አማራጭ | መግለጫ |
|---|---|
| ዕቃዎች (By Item) | ከተቀመጠው የዋጋ ዝርዝር ውስጥ ዕቃዎችን ለመምረጥ። |
| በመለያ (By Item Code) | ዕቃውን በፍጥነት ለማግኘት የዕቃውን ኮድ ለማስገባት። |
| ልዩ ልዩ (Miscellaneous) | በዋጋ ዝርዝርዎ ውስጥ የሌለን ዕቃ ለመሸጥ። |
| የደረሰኝ ማሻሻያ (Invoice Adjustment) | ነባር ደረሰኞችን ለመቅዳት (copy) ወይም ለመሰረዝ (cancel)። |
| ሪፖርቶች (Reports) | የሽያጭ ሪፖርቶችን ለማውጣት። |
መደበኛ ደረሰኝ መቁረጥ
1. የሽያጭ ዓይነት መምረጥ
እንደ ፍላጎትዎ ከሚከተሉት ውስጥ አንዱን ይምረጡ፦
| የሽያጭ ዓይነት | መቼ ጥቅም ላይ ይውላል? |
|---|---|
| ዕቃዎች (By Item) | በብዛት ጥቅም ላይ የሚውለው — ከዋጋ ዝርዝር ውስጥ መምረጥ። |
| በመለያ (By Item Code) | ፈጣን ዘዴ — የዕቃውን ኮድ በቀጥታ ማስገባት። |
| የተለያዩ (Miscellaneous) | ለፈጣን ሽያጮች — ዋጋ እና ብዛት ብቻ በማስገባት። |
2. ዕቃዎችን መምረጥ
ዕቃዎች
ዕቃዎችን ማስገባት
- በዋጋ ዝርዝርዎ ውስጥ ለመንቀሳቀስ የግራ (8) እና የቀኝ (6) ቁልፎችን ይጠቀሙ።
- ዕቃ ለመምረጥ የመካከለኛውን ቁልፍ (7) ይጫኑ።
- የቁልፍ ሰሌዳውን በመጠቀም ብዛቱን (quantity) ያስገቡ።
- ብዛቱን ለማረጋገጥ የመካከለኛውን ቁልፍ (7) ይጫኑ።
- ስክሪኑ ወደ ዕቃዎች ማውጫ ይመልስዎታል።
- ሌላ ዕቃ ማከል ከፈለጉ ከቅደም-ተከተል ቁጥር 2 እስከ 4 ያለውን ይደግሙ።
ምክር፦ የተግባር (Function - 9) ቁልፍን ተጭነው በመቀጠል የዕቃውን የዝርዝር ቁጥር በመጻፍ አቋራጮችን መጠቀም ይችላሉ። ይህ በቀጥታ ወደ ቅደም-ተከተል ቁጥር 3 ይወስደዎታል።
ቅናሽ ማከል
ዕቃ በማከል ላይ እያሉ የሚከተሉትን በማድረግ ቅናሽ ማስገባት ይችላሉ፦
- በብዛት (quantity) ስክሪን ላይ እያሉ የተግባር (Function - 9) ቁልፍን ይጫኑ።
- የቅናሽ መጠኑን ያስገቡ።
- ቅናሹን ለማረጋገጥ የመካከለኛውን ቁልፍ (7) ይጫኑ።
- ለማረጋገጥ ብዛቱን እንደገና ያስገቡ።
ማሳሰቢያ፦ የሚደረገው ቅናሽ ከዕቃው ጠቅላላ ዋጋ መብለጥ የለበትም።
ያስገቡትን እቃዎች መከለስ
- የደረሰኙን ማጠቃለያ ለማየት የተግባር (Function - 9) ቁልፍን እና በመቀጠል የቀኝ (6) ቁልፍን ይጫኑ።
-
የሚከተሉትን ያያሉ፦
- ሁሉም ዕቃዎች ከነብዛታቸው እና ዋጋቸው ይታያሉ። በተመረጡት ዕቃዎች ላይ ወደ ግራ እና ቀኝ መጓዝ ይችላሉ።
-
አንድን የተወሰነ ዕቃ ከማጠቃለያ ውስጥ ለማጥፋት፣ በዕቃው ላይ የመካከለኛውን ቁልፍ (7) በመጫን እና በአጥፋ (delete) ላይ የመካከለኛውን ቁልፍ (7) በመጫን ማጥፋት ይችላሉ።
- ከማጠቃለያ ማውጫ ለመውጣት ወደ ዕቃዎች ስክሪን እስኪደርሱ ድረስ የግራ ቁልፍን ይጫኑ።
ሽያጩን ማጠናቀቅ
- በዋጋ ዝርዝር ስክሪን ላይ እያሉ የተግባር (Function - 9) ቁልፍን እና በመቀጠል የመካከለኛውን ቁልፍ (7) ይጫኑ።
- ጠቅላላ ድምር ዋጋ እና አጠቃላይ የዕቃዎች ብዛት ወደሚታይበት የማረጋገጫ ስክሪን ይደርሳሉ።
በዕቃ ኮድ
ዕቃዎችን ማስገባት
- የቁልፍ ሰሌዳውን በመጠቀም የዕቃውን ኮድ (ለምሳሌ፦
1) ያስገቡ። - ለማረጋገጥ የመካከለኛውን ቁልፍ (7) ይጫኑ።
- ብዛቱን (quantity) ያስገቡ።
- ለማረጋገጥ የመካከለኛውን ቁልፍ (7) ይጫኑ።
ቅናሽ ማከል
- በብዛት ስክሪን ላይ እያሉ የተግባር (Function - 9) ቁልፍን ይጫኑ።
- የቅናሽ መጠኑን ያስገቡ።
- ለማረጋገጥ የመካከለኛውን ቁልፍ (7) ይጫኑ።
- ለማረጋገጥ ብዛቱን እንደገና ያስገቡ።
ያስገቡትን እቃዎች መከለስ
- የደረሰኙን ማጠቃለያ ለማየት የጋሪ የተግባር (Function - 9) ቁልፍን ይጫኑ።
- ዕቃዎችን ለማጥፋት በዕቃው ላይ የመካከለኛውን ቁልፍ (7) ይጫኑ እና በአጥፋ (delete) ላይ እንደገና መካከለኛውን (7) ይጫኑ።
- ለመውጣት ወደ ፍለጋ (search) ስክሪን እስኪደርሱ ድረስ የግራ ቁልፍን ይጫኑ።
ሽያጩን ማጠናቀቅ
- በፍለጋ (search) ስክሪን ላይ እያሉ የቀኝ ቁልፍን ይጫኑ።
- ጠቅላላ ድምር ዋጋ እና አጠቃላይ የዕቃዎች ብዛት ወደሚታይበት የማረጋገጫ ስክሪን ይደርሳሉ።
የተለያዩ (Miscellaneous)
ዕቃዎችን ማስገባት (Entering Items)
- ዋጋውን ያስገቡ።
- ለማረጋገጥ የመካከለኛውን ቁልፍ (7) ይጫኑ።
- ብዛቱን ያስገቡ።
- ለማረጋገጥ የመካከለኛውን ቁልፍ (7) ይጫኑ።
- ጠቅላላ ድምር ዋጋ እና አጠቃላይ የዕቃዎች ብዛት ወደሚታይበት የማረጋገጫ ስክሪን ይደርሳሉ።
ቅናሽ ማከል
- በብዛት ስክሪን ላይ እያሉ የተግባር (Function - 9) ቁልፍን ይጫኑ።
- የቅናሽ መጠኑን ያስገቡ።
- ለማረጋገጥ የመካከለኛውን ቁልፍ (7) ይጫኑ።
- ለማረጋገጥ ብዛቱን እንደገና ያስገቡ።
ሽያጩን ማጠናቀቅ
- ብዛቱን ካስገቡ በኋላ የመካከለኛውን ቁልፍ (7) ይጫኑ።
- በማረጋገጫ ስክሪኑ ላይ ጠቅላላ ድምር ዋጋውን እና አጠቃላይ የዕቃዎች ብዛትን ያያሉ።
4. የሽያጭ ዓይነት መምረጥ
- በማረጋገጫ (confirm) ስክሪን ላይ እያሉ በB2B፣ B2G እና B2C መካከል ለመምረጥ የቀኝ (6) ቁልፍን ይጫኑ፤ መሣሪያው በB2B፣ B2C እና B2G መካከል እንዲመርጡ ያስችልዎታል፤ በተጨማሪም አጠቃላይ ሂደቱን ለመሰረዝ የሚያስችል የሰርዝ (cancel) አማራጭ አለ።
- B2B ወይም B2C የመረጡ ከሆነ፣ ነካ የቲን (TIN) ቁጥር እንዲያስገቡ ይጠይቅዎታል እና አስገብተው ያረጋግጡ።
5. የተቀናሽ ግብር ማከል
- ነካ የለም (No)፣ 3% እና 30% ከሚሉ አማራጮች ውስጥ በመምረጥ የዊዝሆልዲንግ ታክስ ማከል ይፈልጉ እንደሆነ ይጠይቅዎታል።
- የመረጡት ዋጋ በራስ-ሰር ተፈጻሚ ይሆናል።
አስፈላጊ፦ የዊዝሆልዲንግ ታክስ ለማስላት የደረሰኙ ጠቅላላ መጠን ከ20,000 (ሃያ ሺህ) ብር በላይ መሆን አለበት።
6. የደንበኛ አድራሻ ማስገባት
- ደንበኛው የደረሰኝ መረጃ እንዲደርሰው የደንበኛውን አድራሻ (የስልክ ቁጥር ወይም ኢሜይል) ማካተት ይፈልጉ እንደሆነ ነካ ይጠይቃል።
- ማካተት ከፈለጉ አድራሻውን አስገብተው ያረጋግጡ፦
- ስልክ ቁጥር ለማስገባት፦ phone number የሚለውን ይምረጡ እና ቁጥሮቹን በ0901020304 ወይም በ901020304 ቅርጸት ያስገቡ፤ የመካከለኛውን ቁልፍ (7) ን ይጫኑ፤ ከዚያ የማረጋገጫ ስክሪኑ ሲመጣ እርግጠኛ ከሆኑ ማረጋገጫ የመካከለኛውን ቁልፍ (7) (confirm) ን ይጫኑ።
- ኢሜይል ለማስገባት፦ email የሚለውን ይምረጡ እና ኢሜይሉን እንደ customer@gmail.com አድርገው ያስገቡ።
ምክር፦ የ @ ምልክትን ለማግኘት በቁልፍ ሰሌዳው ላይ ያለውን ቁጥር 1 በፍጥነት 3 ጊዜ ይጫኑ ወይም ምልክቱ እስኪታይ ድረስ ተጭነው ይቆዩ።
7. የክፍያ ዘዴ መምረጥ
የክፍያ ዘዴውን ይምረጡ፦
| ዘዴ | መግለጫ |
|---|---|
| Cash | በጥሬ ገንዘብ የሚፈጸም ክፍያ። |
| Phone | በሞባይል ገንዘብ (ለምሳሌ፦ Telebirr, M-PESA) የሚፈጸም ክፍያ። |
| Credit | በብድር የሚደረግ ሽያጭ (ደረሰኙ ላይ "credit sale" ተብሎ ይወጣል)። |
| Account | በባንክ አካውንት ማስተላለፍ (transfer) የሚደረግ ክፍያ። |
ማሳሰቢያ፦ ለPhone እና ለAccount ክፍያዎች፣ በፖስ > የክፍያ መቀበያ ስር የክፍያ መቀብያ (payment platform) አስቀድሞ መግባት አለበት።
8. ክፍያውን ማከናወን
- ክፍያውን ለማጠናቀቅ በስክሪኑ ላይ የሚመጡትን መመሪያዎች ይከተሉ።
- ለPhone ክፍያዎች፣ የደንበኛውን ስልክ ቁጥር አስገብተው ማረጋገጥ ይኖርብዎታል።
- ለAccount ክፍያዎች፣ የአካውንት ቁጥሩን አስገብተው ማረጋገጥ ሊኖርብዎት ይችላል።
9. ደረሰኙን ማውጣት
- የተመረጠውን የክፍያ ዘዴ ካረጋገጡ በኋላ መሣሪያው የጥበቃ ስክሪን (wait screen) ያሳያል፤ ከዚያም ከሚከተሉት ውስጥ አንዱ ይከናወናል፦
- የCash ወይም የcredit ክፍያ ዘዴ ከተመረጠ፣ ከጥቂት ጊዜ በኋላ ደረሰኙ ይታተማል።
- የPhone ክፍያ ዘዴ ከተመረጠ፣ በደንበኛው ስልክ ላይ የUSSD ማሳወቂያ (push) ይወጣል፤ ደንበኛው ክፍያውን ሲያጸድቅ ብቻ ደረሰኙ ይቆረጣል።
- የAccount ክፍያ ዘዴ ከተመረጠ፣ የአካውንቱ ባለቤት ስልክ ላይ የተላከውን የአንድ ጊዜ የይለፍ ቃል (OTP) እንዲያስገቡ ነካ ይጠይቅዎታል፤ ደንበኛው ግብይቱን ሲያጸድቅ ብቻ ደረሰኙ ይቆረጣል።
10. ተጨማሪዎች
| አማራጭ | እንዴት ተፈጻሚ ይሆናል? |
|---|---|
| የአገልግሎት ክፍያ (Service Charge) | በፖስ > አገልግሎት > የአግልግሎት ክፍያ ላይ ባስገቡት በመመስረት በራስ-ሰር ታስቦ ይታከላል። |
| ቫት (VAT) | በዕቃው ባህሪ መመስረት በራስ-ሰር ታስቦ ይሰላል። |
ማሳሰቢያ፦ በልዩ ልዩ (Miscellaneous) ማውጫ የሚጠቀሙ ከሆነ ሁልጊዜ 15% ቫት (VAT) ተፈጻሚ ይሆናል።
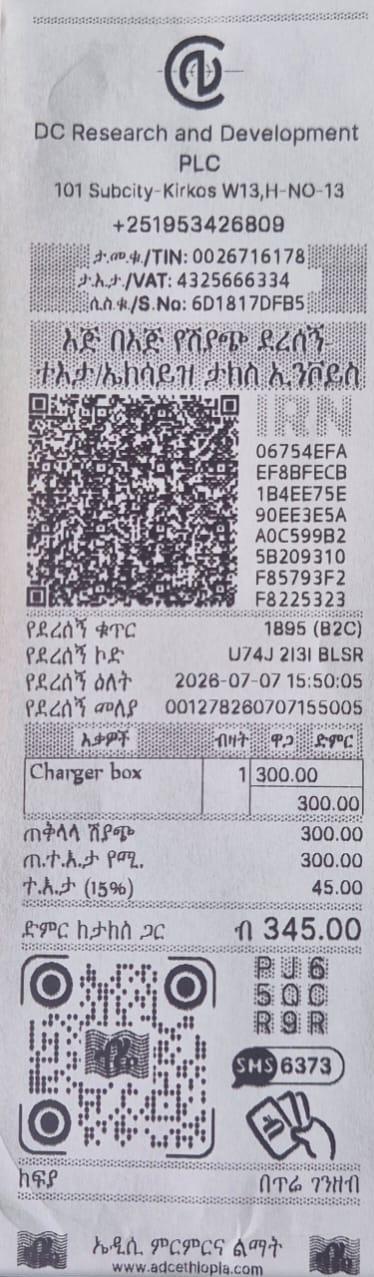
11. ደረሰኙን ማተም
- ክፍያው ከተረጋገጠ በኋላ ደረሰኙ ይታተማል።
- ፕሪንተሩ የኪው አር (QR) ኮድ እና ሁሉንም አስፈላጊ ዝርዝሮች የያዘ ሕጋዊ የታክስ ደረሰኝ ያትማል።
የሚቀጥሉ እርምጃዎች
ነባር ደረሰኞችን እንዴት ማሻሻል እንደሚችሉ ይማሩ።
➡️ ወደ የደረሰኝ ማሻሻያ ይቀጥሉ
Invoice Issuance
The Sales application on your NEKA allows you to issue different types of invoices. This guide covers all the ways you can create an invoice.
Accessing the Sales Menu
- From the Home Menu, navigate to Sales.
- Press the middle key (button 7) to enter.
You will see the following options:
| Option | Description |
|---|---|
| By Item | Select items from your saved price list. |
| By Item Code | Enter the item code to quickly find an item. |
| Miscellaneous | Sell an item that is not in your price list. |
| Invoice Adjustment | Copy or cancel existing invoices. |
| Reports | Generate sales reports. |
Issuing a Standard Invoice
1. Select the Sale Type
Choose one of the following based on your needs:
| Sale Type | When to Use |
|---|---|
| By Item | Most common – select from your price list. |
| By Item Code | Quick – enter the item code directly. |
| Miscellaneous | For quick sales jsut amount and quantity. |
2. Add Items to the Invoice
By Item
Entering Items
- Use the left (8) and right (6) keys to scroll through your price list.
- Press the middle key (7) to select an item.
- Enter the quantity using the keypad.
- Press middle key (7) to confirm the quantity
- The screen will take you back to the items menu
- if you want to add another item repeat starting from No. 2 to No. 4
Tip: You can also use shortcuts by pressing Function (9) then typing the item number. This will take you to directly step No. 3
Adding Discounts
While adding an item, you can enter a discount by:
- Pressing the Function key (9) while in the quantity screen.
- Entering the discount amount.
- Pressing middle key (7) to confirm the discount.
- Enter quantity again to confirm
Note: The discount cannot exceed the total item price.
Review the Invoice Cart
- Press the Function key (9) followed by right (6) to view the invoice summary.
-
You will see:
- All items with quantities and prices will be showen. Navigate left and right to the selected the items.
-
You can delete items from the cart by presssing middle key (7) on a specific item and pressing middle key (7) on delete
- To exit the cart menu press left key untill you reach the items screen.
Finalyze the sales
- While on price list screen Press the Function key (9) followed by middle key (7)
- You will reach the confirm screen with grand total amount and total number of items.
By Item Code
Entering Items
- Enter the item code (e.g.,
1) using the keypad. - Press middle key (7) to confirm.
- Enter the quantity.
- Press middle key (7) to confirm.
Adding Discounts
While adding an item, you can enter a discount by:
- Pressing the Function key (9) while in the quantity screen.
- Entering the discount amount.
- Pressing middle key (7) to confirm the discount.
- Enter quantity again to confirm
Note: The discount cannot exceed the total item price.
Review the Invoice Cart
- Press the Cart Function key (9) to view the invoice summary.
-
You will see:
- All items with quantities and prices will be showen. Navigate left and right to the selected the items.
-
You can delete items from the cart by presssing middle key (7) on a specific item and pressing middle key (7) on delete
- To exit the cart menu press left key untill you reach the search screen.
Finalyze the sales
- While on search screen press right key
- You will reach the confirm screen with grand total amount and total number of items.
Miscellaneous
Entering Items
- Enter the price.
- Press middle key (7) to confirm.
- Enter the quantity.
- Press middle key (7) to confirm.
- You will reach the confirm screen with grand total amount and total number of items.
Adding Discounts
While adding an item, you can enter a discount by:
- Pressing the Function key (9) while in the quantity screen.
- Entering the discount amount.
- Pressing middle key (7) to confirm the discount.
- Enter quantity again to confirm
Note: The discount cannot exceed the total item price.
Finalyze the sales
- After entering the quantity Press the middle key (7)
- You will reach the confirm screen with grand total amount and total number of items.
4. Choose Sales Type
- If you want to choose between B2B B2G and B2C while on confirm screen press right (6) the device will let you select between B2B, B2C and B2G, in addation a cancel option to cancel the entire operation.
- If you choose B2B or B2C the device will promt you to enter TIN number and confirm.
5. Add Withholding
- Device will ask if you want to add withholding amount by choosing from No, 3% and 30%
- Your selected value will be automatically applied.
Important: The Invoice amount must be greater tahn 20000 thousand in order to do withholding.
6. Enter Customer Address
- Device will ask if you want to include the customers address either phone number or email so that the customer can receive the invoice information
- If you choose to include customer address enter the address and confirm
- Entering phone number: select phone number and enter the numbers as either 0901020304 or 901020304 press enter then the confirm screen will appear press confirm if you are sure
- Entering Email: select email and enter the email as customer@gmail.com
Tip: You can find the @ symbol by pressing the Number 1 key on the keypad 3 times quickly or holding it untill you see the symbol
7. Select Payment Method
Choose the payment method:
| Method | Description |
|---|---|
| Cash | Payment in physical cash. |
| Phone | Payment via mobile money (e.g., Telebirr, M-PESA). |
| Credit | Payment on credit (invoice will show "credit sale"). |
| Account | Payment via bank account transfer. |
Note: For Phone and Account payments, you will need to have a payment platform set up in POS > Payment Management.
7. Process Payment
- Follow the on‑screen prompts to complete the payment.
- For Phone payments, you need to enter the customer's phone number and confirm
- For Account payments, you may need to enter the account number and confirm
8. Genrerate the invoice
-
After confirming the selected payment mode the device will show a wait screen and one of the following will happen:
-
If Cash or credit payment mode is selected shortly after the invoice wil be printed
- If Phone payment mode is selected a ussd push will popup on the customers phone so he/she can approve the transaction only then the invoice can be done.
- If Account payment mode is selected the device will prompt you to enter an OTP that is sent to the account holder's phone so he/she can approve the transaction only then the invoice can be done.
9. Additionals
| Option | How to Apply |
|---|---|
| Service Charge | Automatically applied based on your settings. |
| VAT | Automatically calculated based on item settings. |
Note: 15% VAT will always apply if you are using Miscellaneous menu.
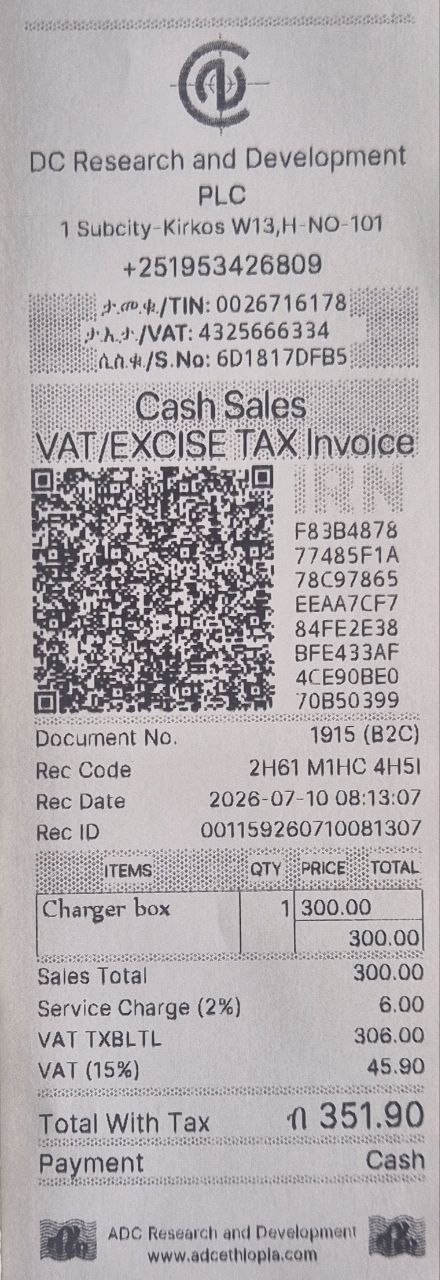
10. Print the Receipt
- Once payment is confirmed, the receipt will be printed automatically.
- The printer will print the tax‑compliant invoice receipt with QR code and all required details.
Next Steps
Learn how to adjust existing invoices.
➡️ Continue to Invoice Adjustment