ቻርጅ ማድረግ
ይህ መመሪያ የእርስዎን ውሪ ነካ እንዴት በትክክል እና በደኅንነት ቻርጅ ማድረግ እንደሚችሉ ያብራራል።
መሣሪያውን እንዴት ቻርጅ ማድረግ እንደሚቻል
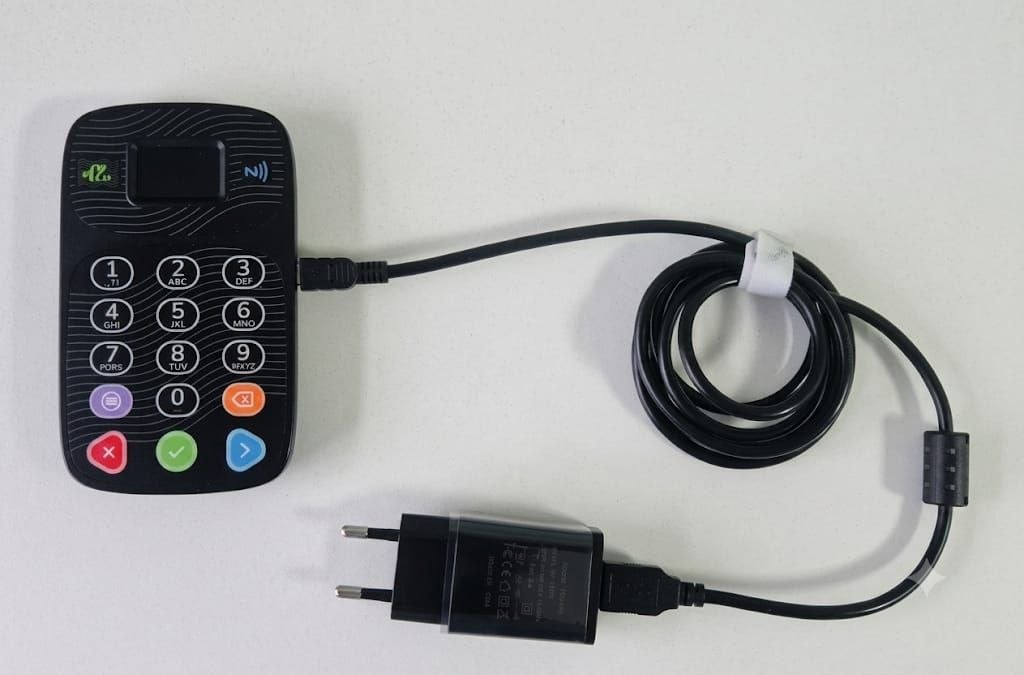
- የኃይል አስማሚውን (power adapter) በመሣሪያው ላይ ካለው የቻርጅ ማድረጊያ ቀዳዳ (ቁጥር 4) ጋር ያገናኙ።
- አስማሚውን (adapter) ከግድግዳ ሶኬት ጋር ያገናኙ።
- መሣሪያው የባትሪው ምልክት በሚገኝበት የሁኔታ ባር (status bar) ላይ የቻርጅ ማድረጊያ ምልክት (የመብረቅ ምልክት) ያሳያል።
የቻርጅ ማድረጊያ ምልክት
- መሣሪያው ቻርጀሩን እንደለየ፣ ከባትሪው ምልክት በስተግራ በኩል ከታች ያለው የመብረቅ ምልክት ብቅ ይላል።

የቻርጅ ማጠናቀቂያ ሰዓት
| ደረጃ | የቻርጅ ማድረጊያ ሰዓት |
|---|---|
| ከ0–80% | በግምት 2 ሰዓት ከ30 ደቂቃ። |
| ከ80–100% | በግምት ተጨማሪ 20 ደቂቃ። |
| ሙሉ በሙሉ ለመሙላት | በጠቅላላው በግምት 3 ሰዓት። |
ማስታወሻ፦ የቻርጅ ማጠናቀቂያ ሰዓት እንደ ቻርጀሩ እና እንደ ባትሪው ሁኔታ ሊለያይ ይችላል።
ቻርጅ እየተደረገ መሣሪያውን መጠቀም
መሣሪያው ቻርጅ እየተደረገ ባለበት ወቅት መጠቀም ይችላሉ። ነገር ግን፦
- መሣሪያው ሙሉ በሙሉ ለመሙላት ረጅም ሰዓት ሊወስድበት ይችላል።
- መሣሪያው ከተለመደው በተለየ ትንሽ ሊሞቅ ይችላል – ይህም የተለመደ ክስተት ነው።
ለቻርጅ አጠቃቀም የሚረዱ የደኅንነት ምክሮች
| ጠቃሚ ምክር | መግለጫ |
|---|---|
| ከመሣሪያው ጋር የመጣውን ቻርጀር መጠቀም | ከመሣሪያው ጋር አብሮ የተሰጠውን ቻርጀር ብቻ ይጠቀሙ። |
| ከከፍተኛ ሙቀት መራቅ | በቀጥታ የፀሐይ ብርሃን በሚያርፍበት ቦታ ወይም ከሙቀት ምንጮች አጠገብ ቻርጅ አያድርጉ። |
| መሣሪያውን አለመሸፈን | ቻርጅ በሚያደርግበት ጊዜ በቂ አየር እንዲያገኝ ያድርጉ። |
| ሲሞላ መንቀል | መሣሪያው ሙሉ በሙሉ ቻርጅ ሆኖ ሲያበቃ ቻርጀሩን ይንቀሉ። |
| ብልሽቶችን መፈተሽ | ከእያንዳንዱ አጠቃቀም በፊት ኬብሉን (cable) እና አስማሚውን (adapter) ለጉዳት ይፈትሹ። |
መሣሪያው ቻርጅ ካላደረገ
| ችግር | ምን መደረግ አለበት? |
|---|---|
| የቻርጅ ማድረጊያ ምልክት አልታይም | የኬብሉን ግንኙነት ይፈትሹ። ሌላ ሶኬት ይሞክሩ። |
| ቀስ ብሎ ቻርጅ ያደርጋል | ከመሣሪያው ጋር የመጣውን ቻርጀር ይጠቀሙ። መሣሪያውን ያጥፉት። |
| መሣሪያው በጣም ይሞቃል | ወዲያውኑ ቻርጀሩን ይንቀሉ። እንዲቀዘቅዝ ይተዉት። ችግሩ እንደገና ከተከሰተ የቴክኒክ ድጋፍ ቡድናችንን ያነጋግሩ። |
| ባትሪው ኃይል አይይዝም | ባትሪው መቀየር ሊያስፈልገው ይችላል። የቴክኒክ ድጋፍ ቡድናችንን ያነጋግሩ። |
የኃይል መቆራረጥ (መብራት መጥፋት) በሚያጋጥምበት ጊዜ
- የባትሪው ምልክት የቀረውን የኃይል መጠን ያሳያል።
- መብራት ሲመለስ ቻርጀሩን ይሰኩት።
የሚቀጥሉ እርምጃዎች
ለተጨማሪ እገዛ፣ የዕክሎች መፍቻ ክፍሉን ይመልከቱ።
➡️ ወደ ዕክሎች መፍቻ ይቀጥሉ
Charging
This guide explains how to charge your Wurii NEKA correctly and safely.
How to Charge the Device
- Connect the power adapter to the charging port (number 4) on the device.
- Plug the adapter into a wall socket.
- The device will show a charging indicator (lightning bolt) in the status bar where the battery icon is located.
Charging Indicator
- As soon as the device detects the charger the below icon Lightning bolt will popup at the left side of the battery icon.
Charging Time
| State | Charging Time |
|---|---|
| 0–80% | Approximately 2 hour and 30 minutes. |
| 80–100% | Approximately 20 additional minutes. |
| Full charge | Approximately 3 hours total. |
Note: Charging time may vary depending on the charger and battery condition.
Using the Device While Charging
You can use the device while it is charging. However:
- The device may take longer to charge.
- The device may get slightly warmer than usual – this is normal.
Charging Safety Tips
| Tip | Description |
|---|---|
| Use the supplied charger | Only use the charger that came with the device. |
| Avoid extreme temperatures | Do not charge in direct sunlight or near heat sources. |
| Do not cover the device | Ensure airflow while charging. |
| Unplug when full | Disconnect the charger once the device is fully charged. |
| Check for damage | Inspect the cable and adapter for damage before each use. |
If the Device Does Not Charge
| Problem | What to Do |
|---|---|
| No charging indicator | Check the cable connection. Try a different socket. |
| Charges slowly | Use the supplied charger. Turn off device. |
| Device gets very hot | Unplug immediately. Allow to cool. Contact support if it happens again. |
| Battery not holding charge | The battery may need replacement. Contact support. |
What to Do During a Power Outage
- The battery icon will show the remaining charge.
- Plug in the charger when power is restored.
Next Steps
For more help, see the Troubleshooting section.
➡️ Continue to Troubleshooting