የነካ ገጽታና አቀማመጥ
የእርስዎን ነካ በደንብ ይወቁ! የመሣሪያውን አካላዊ ቅርፅና አቀማመጥ መረዳት መሣሪያውን ለመጠቀምና በዚህ መመሪያ ውስጥ ያሉትን ማብራሪያዎች ለመከተል ይበልጥ ቀላል ያደርግልዎታል።
የነካ አጠቃላይ እይታ
ከዚህ በታች የእያንዳንዱ አስፈላጊ ክፍል በቁጥር የተመለከተበት የነካ ምስላዊ መግለጫ ይገኛል። በእጅዎ ባለው መሣሪያ ላይ እያንዳንዱን ክፍል ለማግኘት ጥቂት ሰከንዶችን ይውሰዱ።
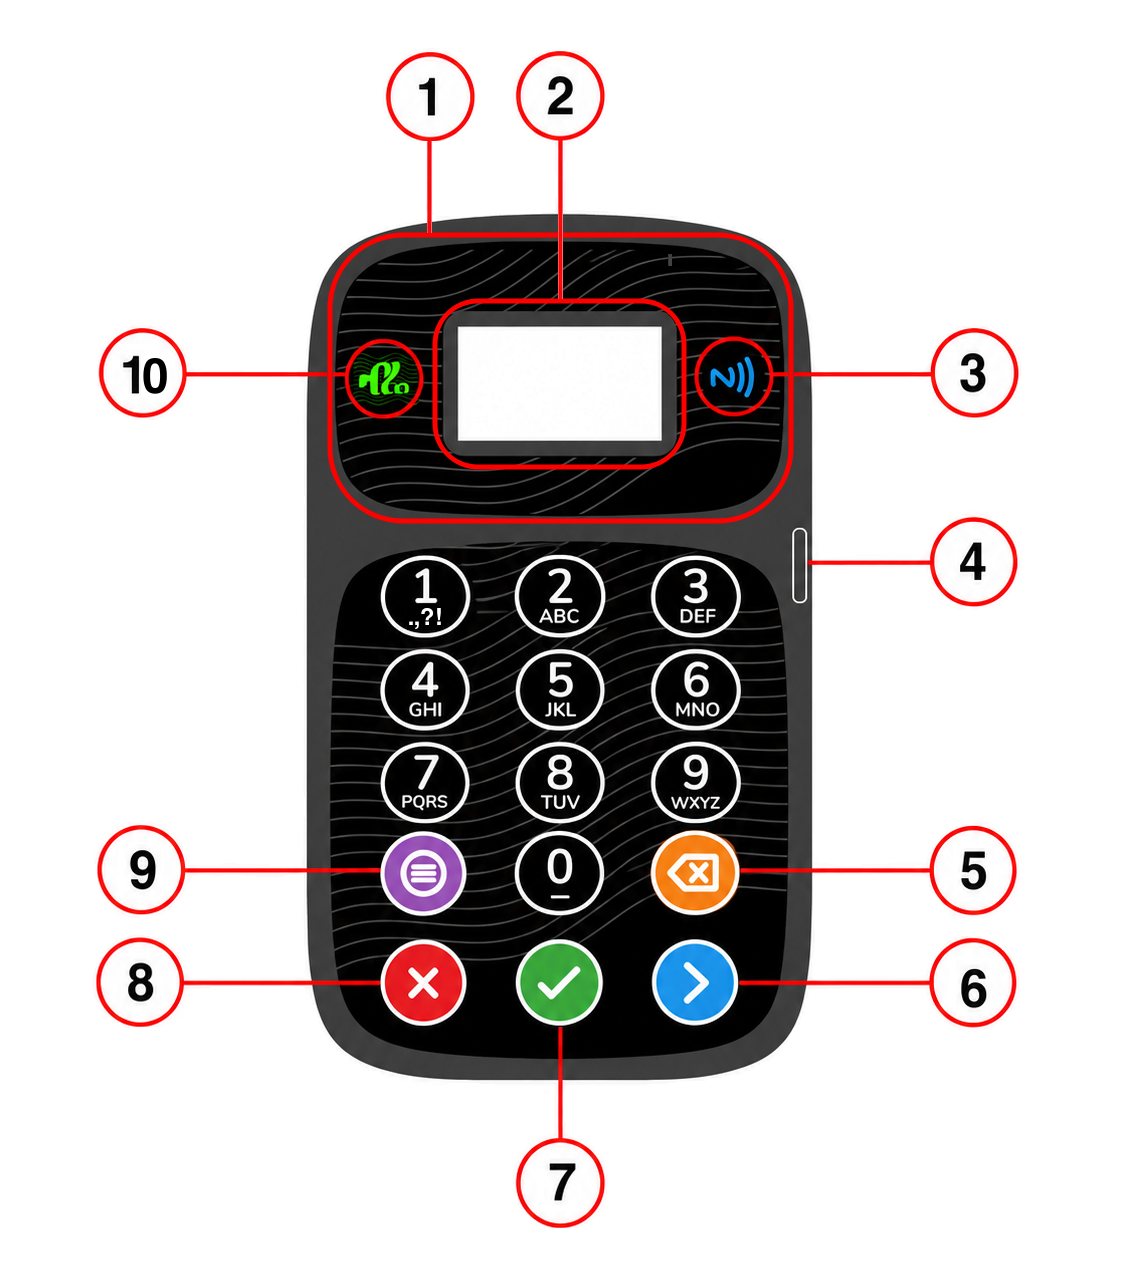
የቁጥሮች ማጣቀሻ መግለጫ
| ቁጥር | ክፍል | መግለጫ |
|---|---|---|
| 1 | የNFC ማንበቢያ ቦታ (NFC Reading Area) | በመሣሪያው ፊት ለፊት እና በጀርባ በኩል ይገኛል። ወደ ሥርዓቱ ለመግባት፣ ድርጊቶችን ለመፍቀድ ወይም አዲስ ካርዶችን ለማውጣት የNFC ካርድዎን እዚህ ላይ ያስንኩ። |
| 2 | የማሳያ ስክሪን (Display Screen) | ማውጫዎችን (menus)፣ ደረሰኞችን፣ ሪፖርቶችን እና ሁሉንም የስርዓት መረጃዎችን የሚያዩበት ዋናው ስክሪን ነው። |
| 3 | የNFC ምልክት (NFC Capability Icon) | ይህ ምልክት መሣሪያው የNFC ካርዶችን ማንበብ እንደሚችል ያሳያል። |
| 4 | የቻርጅ ማድረጊያ ቀዳዳ (Charging Port) | መሣሪያውን ቻርጅ ለማድረግ የኃይል አስማሚውን (charger) እዚህ ጋር ያገናኙ። |
| 5 | የኋላ መመለሻ ቁልፍ (Backspace Key) | የጻፉትን የመጨረሻ ፊደል ወይም ቁጥር ለመሰረዝ ይህንን ቁልፍ ይጫኑ። |
| 6 | የቀኝ ቁልፍ (Right Key) | በማውጫዎች ወይም በአማራጮች ውስጥ ወደ ቀኝ ለመንቀሳቀስ ይጫኑ። |
| 7 | የመካከለኛ / ማስገቢያ ቁልፍ (Middle / Enter Key) | ምርጫን ለማረጋገጥ፣ ወደ ማውጫ ለመግባት ወይም አንድን ተግባር ለማጠናቀቅ ይጫኑ። |
| 8 | የግራ ቁልፍ (Left Key) | በማውጫዎች ውስጥ ወደ ግራ ለመንቀሳቀስ፣ ወደ ኋላ ገጽ ለመመለስ ወይም አንድን ተግባር ለመሰረዝ ይጫኑ። |
| 9 | የተግባር ቁልፍ (Function Key) | ልዩ ተግባራትን ለማንቃት ይጫኑ። ለምሳሌ፦ Function ቁልፍን ተጭነው በመቀጠል ቁጥር በመጻፍ በቀጥታ ወደ ፈለጉት ማውጫ መዝለል ይችላሉ። |
| 10 | የብሪ (Birrie) ሥርዓት ምልክት | የመሣሪያው የክፍያ እና የካርድ ሥርዓት በብሪ (Birrie) የሚመራ መሆኑን ያሳያል። |
የቁልፎች አጭር ማጣቀሻ
ብዙ ጊዜ በተደጋጋሚ ለሚጠቀሙባቸው ዋና ዋና ቁልፎች ቀላል ማጠቃለያ ከዚህ በታች ቀርቧል፦
| ቁልፍ | ምን ይሠራል? |
|---|---|
| 8 | ግራ (Left) – ወደ ኋላ መመለሻ፣ ወደ ግራ ማንቀሳቀሻ ወይም መሰረዣ |
| 7 | መካከለኛ / አስገባ (Middle / Enter) – ማረጋገጫ፣ መምረጫ ወይም መቀጠያ |
| 6 | ቀኝ (Right) – በማውጫዎች ወይም በአማራጮች ውስጥ ወደ ቀኝ ማንቀሳቀሻ |
| 5 | የኋላ መመለሻ (Backspace) – የጻፉትን የመጨረሻ ፊደል/ቁጥር መሰረዣ |
| 9 | ተግባር (Function) – አቋራጮችን ማግኛ (ቁልፉን ተጭነው በመቀጠል ቁጥር ይጻፉ) |
የሚቀጥሉ እርምጃዎች
አሁን የመሣሪያውን ገጽታና አቀማመጥ በሚገባ ካወቁ በኋላ፣ መሣሪያውን ለማብራት ዝግጁ ነዎት።
➡️ ወደ መሣሪያውን ማብራት እና ማጥፋት ይቀጥሉ
Neka Layout & Buttons
Let's get to know your NEKA! Understanding the physical layout will make it much easier to use the device and follow the instructions in this manual.
Device Overview
Below is a diagram of the NEKA with each important part labelled with a number. Take a moment to locate each part on your actual device.
Numbered Parts Reference
| Number | Component | Description |
|---|---|---|
| 1 | NFC Reading Area | Located on both the front and back of the device. Tap your NFC card here to sign in, authorise actions, or issue new cards. |
| 2 | Display Screen | The main screen where you see menus, invoices, reports, and all system information. |
| 3 | NFC Capability Icon | This icon indicates that the device can read NFC cards. |
| 4 | Charging Port | Connect the power adapter here to charge the device. |
| 5 | Backspace Key | Press this key to delete the last character you typed. |
| 6 | Right Key | Press to move right through menus or options. |
| 7 | Middle / Enter Key | Press to confirm a selection, enter a menu, or finalise an action. |
| 8 | Left Key | Press to move left through menus, go back to a previous screen, or cancel an action. |
| 9 | Function Key | Press to activate special functions. For example, press Function then type a number to quickly jump to a menu item. |
| 10 | Birrie System Icon | Indicates that the device's payment and card system is ppowered by Birrie. |
Quick Button Reference
Here is a simple summary of the main buttons you will use most often:
| Button | What It Does |
|---|---|
| 8 | Left – go back, move left, or cancel |
| 7 | Middle / Enter – confirm, select, or proceed |
| 6 | Right – move right through menus or options |
| 5 | Backspace – delete the last character you typed |
| 9 | Function – access shortcuts (press then type a number) |
What to Do Next
Now that you know your way around the device, it's time to turn it on.
➡️ Continue to Powering On/Off ይቀጥሉ